
DIY Turkish Hammam invites you to transform a cozy corner of your bathroom into a warm, cleansing sanctuary where ritual and renewal unfold at your own pace, inviting you to slow down, breathe deeply, and listen to your skin’s needs as you begin.
This at-home approach blends the essence of a traditional Turkish bath at home with a modern, accessible home spa ritual that fits busy schedules, creating a structured moment of self-care that respects your time, your space, and your budget.
By design, the experience emphasizes warmth, humidity, and mindful care—key elements of the hammam routine that leave skin refreshed, pores prepared to receive moisture, and the mind soothed through rhythmic breath and gentle touch.
With simple tools and a few dedicated steps, you can recreate a spa-like atmosphere that respects space constraints while delivering comfort, exfoliation, hydration, and a sense of ritual that makes everyday routines feel special.
Think of this guide as your starter kit for a rejuvenating ritual that mirrors pro spa practices, but tailored for a home setting, so you gain confidence, consistency, and a portable escape you can revisit weekly.
Viewed through an LSI lens, the concept centers on warm, humid ambience, steam-rich cleansing, and mindful touch that nourish skin and soothe nerves, linking familiar spa ideas with cultural tradition.
Think of it as a guided at-home ritual of steam and exfoliation that borrows from spa traditions while staying gentle enough for small spaces and non-technical setups, so you can chart progress rather than chase perfection.
If you’re curious about the practical side, you’ll find steps and tools that show how to recreate a hammam at home with accessible products and routines, and you’ll hear about steam bath benefits for skin texture and relaxation.
Ultimately, this approach aligns traditional warmth with modern convenience, turning a modest bathroom into a comforting sanctuary that supports sustainable self-care and a calmer daily rhythm.
DIY Turkish Hammam at Home: A Complete Guide to Starting Your Spa Ritual
DIY Turkish Hammam at home invites you to slow down and honor ritual through a warm, steam-kissed routine. This approach blends elements of the hammam routine with the comforts of a modern home spa ritual, translating centuries-old cleansing and renewal into a practical, weekly self-care practice. By focusing on heat, moisture, exfoliation, and mindful pampering, you can experience Turkish bath at home in a way that honors tradition while fitting a living space.
If you’re curious about how to recreate a hammam at home, start with a 60–90 minute session, dim the lights or light candles, and gather your supplies ahead of time. The aim is to enter a warm, humid environment gradually, then follow the sequence: warm-up and steam, cleanse, exfoliate with kese mitt or loofah, rinse, apply a clay or honey mask if desired, hydrate, and finish with a quiet cooldown. This structured approach preserves the essence of a hammam while staying practical for home use.
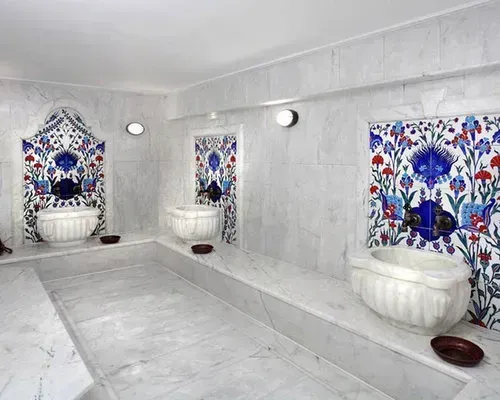
Recreating the Hammam Routine in a Small Space: Tips for a Steam-Driven Experience
Even in a compact bathroom, you can honor the hammam routine by emphasizing heat and humidity. Close the door, run a hot shower to trap steam, and use a portable humidifier to sustain moisture for 15–20 minutes of pampering. Have a kese mitt, a soft loofah, a gentle body wash, and towels within arm’s reach to keep the rhythm smooth. This setup mirrors the discipline and efficiency of a traditional hammam while fitting a smaller living space.
Approach the ritual slowly and mindfully, preserving the core sequence of warmth, cleansing, exfoliation, and hydration. If you’re curious about how to recreate a hammam at home, adjust timing and tools to fit your room, but keep the essential steps intact to maintain the sense of calm and renewal that the tradition offers.
Heat, Humidity, and Mood: Designing the Warmth of Your Home Turkish Bath
Designing the warmth of your home Turkish bath means balancing heat with humidity for comfortable sessions. Aim for a gentle warmth and use a humidifier or steamy shower to sustain moisture for 15–25 minutes. The steam bath benefits extend beyond skin, easing tension and supporting circulation, which enhances the effectiveness of moisturizers and treatments you apply afterward.
Set the mood with dim lighting, soft music, and a moment of mindful breathing. The environment matters as much as the steps, helping you feel grounded while you cleanse and exfoliate. In pursuing a Turkish bath at home, let the atmosphere echo the slow, respectful pace of a traditional hammam to deepen the sense of renewal.
Exfoliation Mastery: Tools, Techniques, and the Kese for Renewed Skin
Exfoliation is the signature step of the hammam routine. Use a kese mitt, loofah, or an exfoliating glove with light-to-moderate pressure to reveal brighter skin and improve product absorption. Begin with larger areas and move upward toward the heart, focusing on rough patches like elbows, knees, and heels. This practice is central to the home spa ritual and delivers the skin-renewing effects that define the hammam experience.
Patch-test any new scrubs on a small area if you have sensitive skin, and avoid aggressive scrubbing on irritated skin. Adjust pressure to your comfort level, ensuring the exfoliation leaves skin polished rather than raw. This respectful, technique-forward approach aligns with the spirit of the DIY Turkish Hammam at home and its emphasis on gradual, restorative care.
Cleansing, Masking, and Hydration: Finishing the Hammam Experience
Cleansing is followed by masking and hydration to complete the hammam ritual. After exfoliation, rinse and cleanse with a gentle product or cleansing oil, then apply a clay or hydrating facial mask if desired. For the body, a light honey or yogurt-based mask can be soothing, while facial care benefits from a mask paired with a nourishing moisturizer. This sequence reinforces the home spa ritual and primes skin for lasting moisture.
Finish with a hydrating moisturizer or natural oil, applied while skin is still warm to lock in moisture. Use upward strokes to support circulation and a smooth, even finish. Afterward, allow a quiet cooldown to settle in a comfortable space; the final phase mirrors the calm, reflective aspect of the hammam routine and the overall Turkish bath-at-home experience.
Safety, Accessibility, and Budget Variations: Making a DIY Hammam Work for You
Safety and accessibility are essential when planning a DIY hammam. Start with shorter steam sessions (15–20 minutes), ensure proper ventilation, stay hydrated, and consult a healthcare professional if you have cardiovascular or breathing concerns. Hygienic practices matter too; use clean towels and washcloths, and sanitize kese mitts and loofahs after each use to prevent the spread of bacteria.
Budget-friendly options keep the ritual approachable: reusable exfoliating mitts, affordable cleansers, and simple masks can sustain the experience without heavy costs. For a more luxe feel, you can add a steam humidifier, Turkish black soap, or mud masks, but always preserve the core sequence—heat, cleanse, exfoliate, rinse, hydrate, and relax. By adapting to your space and budget, you can enjoy a genuine hammam-inspired routine at home without compromising the essence of the tradition.
Frequently Asked Questions
What is a DIY Turkish Hammam and how to recreate a hammam at home to echo a Turkish bath at home?
A DIY Turkish Hammam is a home-spa ritual that brings the Turkish bath at home into your space. It centers on a warm, humid environment with a sequence of steam, gentle cleansing, exfoliation with a kese mitt or loofah, a thorough rinse, optional masks, and a hydrating finish. Plan 60–90 minutes, prepare your space in advance, and progress gradually to build comfort and skin benefits.
What tools are essential for a hammam routine in a DIY Turkish Hammam setup?
Essential tools for a hammam routine in a DIY Turkish Hammam setup include a kese mitt or loofah, soft towels, a mild cleanser (or olive-oil-based cleanser), a body brush, optional masks, and a hydrating moisturizer or body oil. Keep everything within reach and use gentle, non-irritating pressure to protect sensitive skin.
How to recreate a hammam at home as part of a DIY Turkish Hammam routine in a compact space?
To recreate a hammam at home within a DIY Turkish Hammam routine, start with 5–10 minutes of steam, then cleanse, exfoliate with a kese or loofah, rinse, apply a mask if desired, hydrate, and finish with a cooldown. Adjust heat and duration to your comfort, safety, and skin needs.
What are the steam bath benefits of a DIY Turkish Hammam within a home spa ritual?
Steam bath benefits from this home spa ritual include opened pores, improved circulation, better absorption of moisturizers, and a sense of calm. Regular, mindful sessions also support skin texture and overall relaxation.
How often should I perform a DIY Turkish Hammam to maintain skin health in a home spa ritual without irritation?
For balanced results, aim for about once a week or every other week with a DIY Turkish Hammam, adjusting for your skin type and heat tolerance. Patch-test new products, start with shorter steam times, and reduce frequency if you notice dryness or irritation.
Can a DIY Turkish Hammam be adapted for small spaces or a budget-friendly home spa ritual?
Yes. For small spaces or budget-friendly setups, adapt by using a steamy bathroom, a no-steam version with warm towels, and affordable kits. The core hammam sequence—heat, cleanse, exfoliate, rinse, hydrate, and relax—remains the same.
| Aspect | Key Points | How to Apply in a DIY Turkish Hammam |
|---|---|---|
| What it is | Turkish hammam emphasizes warmth, humidity, cleansing, exfoliation, and relaxation as a ritual, not just a bath. | Recreate balance at home with heat, steam, gentle cleansing, exfoliation, and hydration. |
| Environment | Create heat and humidity; aim for comfortable warmth; use steam via shower, humidifier, or steam-friendly setup | Close door while steaming; run humidifier for 15–20 minutes; keep sessions moderate. |
| Timeline | Prepare for 60–90 minutes; progress gradually if new | Set aside 60-90 minutes; progress in stages; plan for workflow. |
| Tools & Products | Kese or loofah, towels, gentle cleanser, olive oil-based cleanser or soap, optional mask, body brush, moisturizer or oil | Gather within arm’s reach; use kese or loofah with gentle pressure; moisturize after. |
| Step-by-step routine | Warmth/steam; cleanse; exfoliate; rinse; optional mask; hydrate; cooldown | Follow steps 1-7; adapt to space and skin type; avoid over-scrubbing |
| Exfoliation detail | Use kese or loofah; light-to-moderate pressure; focus on elbows, knees, heels; patch-test if sensitive | Proceed with gentle circular motions; stop if irritated |
| Variations | No-steam version; small bathroom approach; budget-friendly kits; spa-quality upgrades | Adapt to space and budget while preserving core ritual: warmth, cleansing, exfoliation, hydration |
| Benefits | Skin cleansing, exfoliation, improved circulation, hydration, mindfulness, relaxation | Focus on warm environment, careful cleansing, and nourishing moisturizers for skin and mood |
| Safety | Short sessions if new; hydration; patch tests; ventilation; clean tools | Monitor duration; hydrate; patch-test; rinse and dry; clean gear after use |
| FAQs | Frequency: weekly or biweekly; product substitutions allowed; facial care possible; check for respiratory issues | Adjust schedule to skin type and health; substitute products kept core elements |